Hytale Character Silhouette and Outfit Layering Guide
Learn how to translate a recognizable character into Hytale through hair silhouette, face framing, clothing layers, color contrast, and honest simplification.
When a Hytale character recreation feels wrong, the missing detail is rarely a tiny button or exact shade. More often, the large shapes are competing: the hair changes the head outline, the coat hides the waist, or every clothing layer has the same value. Fixing the silhouette and layer structure usually improves the likeness faster than searching for one perfect cosmetic.
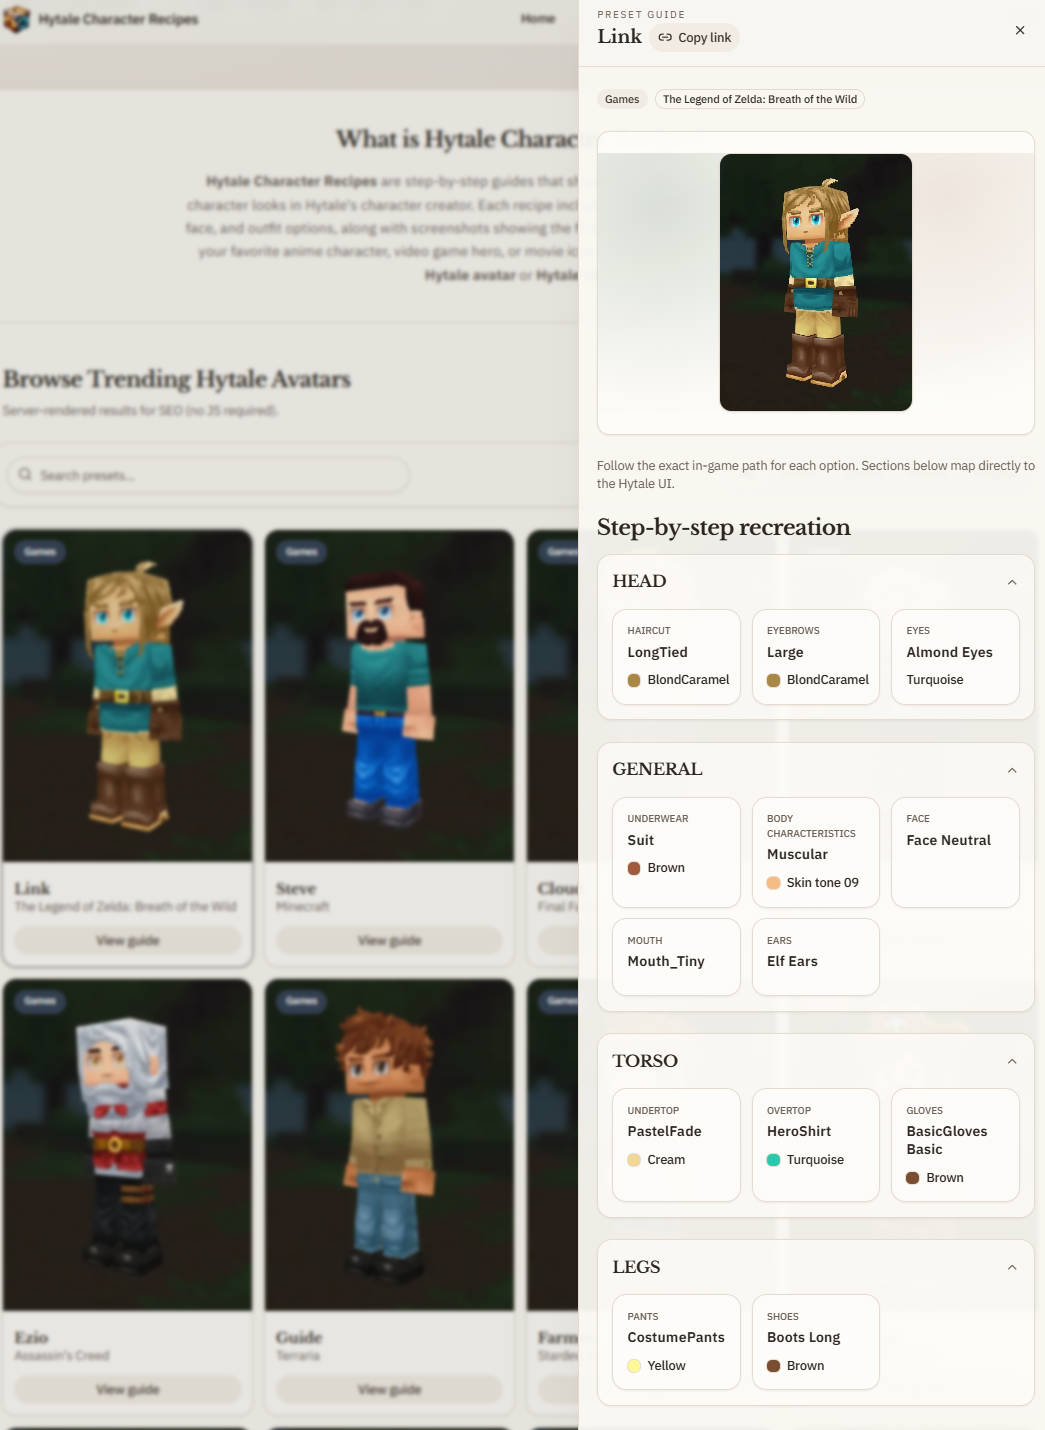
Read the character as large shapes
Begin by shrinking the reference or viewing it from a distance. Ignore eye color, trim, jewelry, and surface patterns. Identify the three or four shapes that remain:
- the outline of the head and hair;
- the width and length of the upper body;
- the transition from torso to legs;
- one signature extension such as a hat, cape, large collar, or boots.
Choose the head silhouette before the face
Hair, hats, hoods, horns, and ears control the outer boundary of the head. Select them before spending time on eyes or mouth details. Look at height, side width, fringe direction, and how the style meets the shoulders.
Do not search only for the closest haircut name. Compare visible structure. A style with the wrong label may reproduce the target's long side locks and exposed forehead better than the option that appears thematically correct.
When no single option matches, preserve the most distinctive part. For one character that may be a high crown; for another it may be a heavy fringe or a long back shape. Explain the compromise in the guide so readers know it is deliberate rather than an overlooked error.
Use the face as a frame, not a portrait
Block-based and stylized creators cannot reproduce an actor or illustration exactly. Aim for the same facial rhythm: open or covered forehead, eye area contrast, brow weight, face width, and the relationship between hair and skin.
Hair framing often matters more than a precise eye shade. A fringe can narrow the visible face; side pieces can make it appear longer; exposed cheeks can make the whole design feel younger or more energetic. Check the face again after every major hair change.
Establish one dominant torso shape
The torso is the largest clothing block, so decide what it is meant to communicate. Is the target primarily a tunic, fitted jacket, long coat, robe, armored chest, or casual shirt? Pick one dominant reading.
Then match its length and width before its decoration. A short, broad jacket creates a different body proportion from a narrow garment extending below the waist. If the creator's closest texture has the correct motif but the wrong outline, a simpler option with the right shape may be the better foundation.
Separate the base layer from the outer layer
Outfit layering becomes readable when each layer has a role. A practical structure is:
- A base layer that fills gaps around the neck, arms, or waist.
- A dominant outer garment that establishes the torso shape.
- One accent layer or accessory that supplies identity.
The layers do not need different colors, but they need a visible boundary. Use a change in lightness, saturation, edge shape, or material impression. A dark coat over an equally dark shirt can merge into one block unless the collar, sleeves, or waist create separation.
Avoid adding an outer piece simply because an empty slot is available. Extra belts, scarves, shoulder items, and gloves can bury the clean shapes that made the reference recognizable. Every layer should strengthen the silhouette, explain a transition, or repeat an important color.
Connect the torso to the legs
Many recreations look convincing above the waist and generic below it. Study where the target's upper garment ends and how the lower body continues the rhythm. A long tunic over narrow trousers creates a strong vertical line. A cropped jacket with wide trousers creates a clear break. A robe may need the legs to stay quiet so the torso remains dominant.
Choose legwear by value and shape before small pattern. If the upper body is complex, a simpler lower half often improves the read. If the target depends on split colors, tall boots, or a bright lower garment, preserve that contrast because it will be visible during normal play.
Footwear also changes perceived proportion. Tall boots extend the lower leg and can anchor an adventurer or uniform design. Bulky shoes can make a light silhouette feel bottom-heavy. Check the full body rather than evaluating footwear in isolation.
Build a small color hierarchy
Reduce the reference to a dominant color, a supporting neutral, and one or two accents. Decide roughly how much area each color occupies. A famous accent should remain an accent; spreading it across the whole outfit can destroy the original balance.
Value contrast is often more important than an exact hue. If the hair and coat are both mid-value brown, their edges may disappear even when each color seems individually plausible. Lighten one, darken the other, or insert a contrasting collar or skin gap.
Simplify patterns into repeatable signals
Detailed prints, embroidery, armor etching, and logos rarely survive a general avatar creator. Translate them into a signal that the game can reproduce: a stripe, a contrasting panel, a belt line, a light collar, or a single accessory.
Choose the signal based on placement. A chest emblem may become a central color break; complex sleeve decoration may become contrasting gloves or cuffs. The substitute should occupy a similar visual area even if it cannot copy the artwork.
Check the design at three distances
Use three views during every revision:
- Close view: inspect face framing, clipping, and color boundaries.
- Medium view: judge recognition and the relationship between hair and torso.
- Far view: test the silhouette and dominant palette during normal play.
If a change improves the close view but damages the medium read, it may be too small to deserve priority. If the character works only in a carefully staged close-up, the major shapes need another pass.
Rotate the avatar as well. Layer intersections, hidden accessories, and hair clipping often appear only from the side or back. A preset page should not rely on one flattering front angle to conceal those limits.
Diagnose common layering failures
When the build stalls, identify the type of failure:
- Everything merges: separate adjacent layers with lightness or edge shape.
- The head feels wrong: revisit the hair or hat outline before changing the face.
- The torso looks bulky: remove a redundant outer piece or reduce shoulder width.
- The outfit feels generic: restore one signature color block or accessory.
- The lower half feels unrelated: repeat a torso color in the belt, legs, or boots.
- The screenshot looks right but gameplay does not: test in neutral light at medium distance.
Record the creator path and its limits
Once the look is stable, document the options in the order another player encounters them: body and skin tone, face, hair, upper layers, lower layers, footwear, and accessories. Pair names with a short visual description because labels may change in future Hytale updates.
Add a limitation note for every important missing feature. Examples include an unavailable hat shape, a coat that cannot reach the correct length, or a pattern reduced to a color block. This is not an apology. It is the information that keeps a fan-made recreation from being mistaken for an official skin or exact import.
Final silhouette and layering checklist
Before publishing a Hytale character guide, confirm:
- The avatar is readable as a dark silhouette at small size.
- Hair or headwear preserves the most distinctive head shape.
- The face uses a few strong cues instead of unrelated detail.
- One torso layer has a clear dominant role.
- Base and outer layers remain visually separate.
- The torso and legs form a deliberate proportion.
- The palette has a dominant color, neutral support, and controlled accents.
- Pattern substitutes occupy a useful and repeatable area.
- Front, three-quarter, and distant views all remain convincing.
- Every important mismatch is stated plainly in the creator notes.
Silhouette and layering are useful because they turn an open-ended search into a sequence of decisions. Solve the head outline, dominant torso, lower-body rhythm, and color hierarchy first. Fine detail can then support a structure that already works instead of trying to rescue one that does not.